Travel With Me! Discover trips to Yellowstone, Iceland, Patagonia, and Thailand in 2024 & 2025. Explore here

Everything to Know Before Climbing Mount Rainier – Disappointment Cleaver Route
July 21, 2021

**Please note: this is an outline for climbing Mount Rainier via the Disappointment Cleaver route without a guide. Mount Rainier is not a climb for inexperienced hikers or climbers. If you are interested in climbing Mount Rainier but do not have experience on glaciated mountains or are unfamiliar with crevasse rescue, do not attempt this mountain on your own. There are three guided options that can assist and provide needed instruction to ensure a safe and successful summit.
For years, my husband and I chatted about Rainier in future-tense. We got engaged on Mt. Whitney in California, the tallest mountain in the continental 48. Many of our adventures revolved around mountains and summits. And although Whitney is taller, Mount Rainier has always been considered ‘the beast’ of the lower 48. It was always a matter of when, not if.
In the spring of 2021, we finally pulled the trigger and snagged a couple of camping permits to give it a go. I was excited; not only were we finally getting our chance on the mountain, but I would also get the chance to check off my long-awaited 49th state. What better way to celebrate than standing atop the tallest mountain at an elevation of 14,411ft?
When we first started discussing the climb, I was skeptical and wanted to go with a guided group. We are experienced in the mountains, more than most, but I was still intimidated. Rainier is in a realm of its own when it comes to mountaineering in the continental 48 states. Most of our weekends are spent scrambling, hiking, and climbing mountains, but few are with glaciers or crevasse risk. My husband is more experienced than I, and after consideration, we decided we work best as a team. I felt confident with him to go after an unguided ascent of the Disappointment Cleaver.
How to Prepare for Climbing Mount Rainier via The Disappointment Cleaver
The Disappointment Cleaver (or ‘DC’) route is the easiest route to the summit of Mount Rainier. It is the standard route used by all three mountaineering guides to the summit. However, the term ‘easiest’ does not mean it is easy. The DC route still requires 9000ft of elevation gain, glacier travel, crevasse crossings, rock/icefall hazard, and risk of acute mountain sickness (AMS).
The best way to prepare for climbing Mount Rainier is to climb mountains. We live at the foothills of the Rocky Mountain in Wyoming, making this task easier for us than most. My husband was tagging at least one, if not more, summits a weekend. I mixed weekend hikes with backpacking trips and summits. In the weeks leading up to our departure, I also regularly hiked up the local mountain outside of town.
For those on the east coast, training for elevation and mountain climbing is much more challenging. In your timeline and trip preparation for Rainier, it may be wise to set aside time for a warmup climb in Washington or Oregon before heading straight for Mount Rainier, preferably another glaciated Cascade volcano.
We didn’t stop training once we left for Washington. Leading up to the attempt, we climbed Mt Stuart in Washington (7,700ft elevation gain). My husband bagged Glacier Peak and Abercrombie peak as well.
In addition to preparing physically for the Disappointment Cleaver route, you should also ensure you have all the technical gear to make a safe ascent.
Here is a full gear list for climbing Mount Rainier:
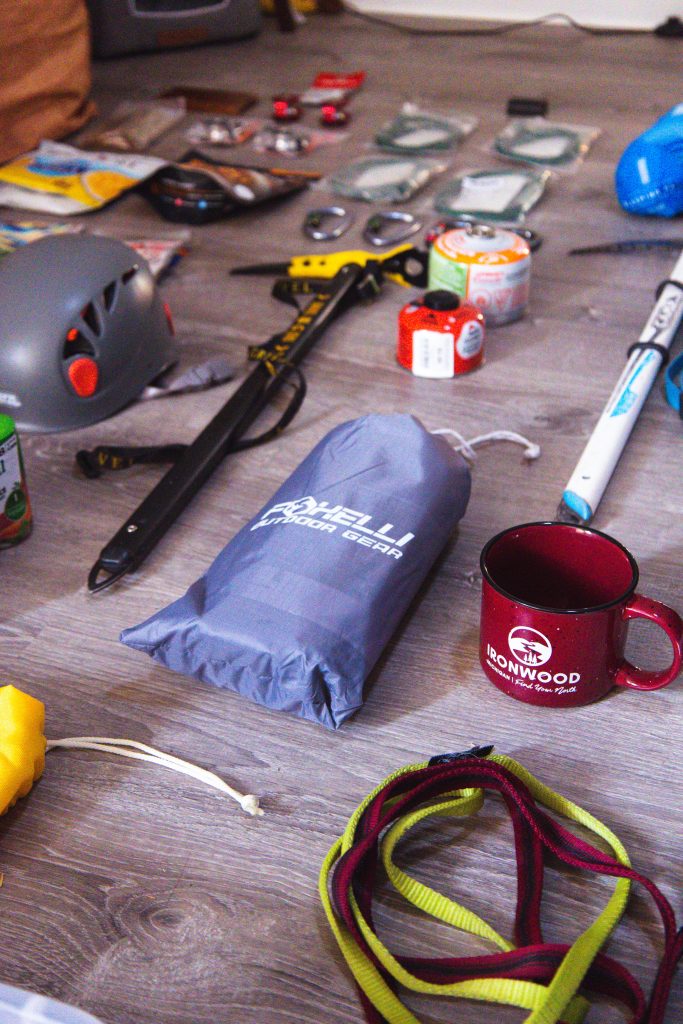
- Helmet
- Climbing harness
- Socks (at least four pairs)
- Gaiters
- Dark-lens sunglasses or snow goggles
- Camp stove + fuel
- Pot/Jetboil
- 0F or 20F down sleeping bag
- Insulated sleeping pad
- Backpacking tent
- Ice axe
- Lighter
- Headlamp
- Down jacket
- Wind jacket
- Waterproof hiking boots
- Crampons
- Sunscreen
- Rope (40m)
- Prussiks
- Carabiners (4)
- Pickets (1)
- Pulleys
- First aid kit
- Camp knife
- Food (mix of protein and calorie-rich food and snacks)
- Chapstick
- External charger
- Winter hat
- Mittens
- 60L backpack
- 3 L water storage
When preparing to climb Rainier, it is not a bad idea to evaluate/upgrade your gear. We decided not to upgrade our sleeping pads, which turned out to be a brutal mistake. Even with a tent footprint, tent layer, sleeping pads, and down sleeping bags, we both got under two hours of sleep the night before the climb on the Cowlitz Glacier. The cold from the glacier seeped right through every layer, and we spent most of the night attempting to huddle as close as possible to rid the feeling that we were sleeping on a giant ice cube. When the alarm finally went off, I couldn’t tell if I was relieved or unsettled. If there is one thing I could go back to change, I would ensure we had top-rated gear for sleeping.
Paradise to Camp Muir: Day 1
Important note: To climb Rainier as an overnight, you MUST make a camp reservation at Camp Muir or Ingraham Flats AND register as a climber with the NPS. There is a climber fee of $56 per person. Before you begin your climb, you must check in with the ranger at the climber hut in Paradise. When you are finished climbing, you must drop your permit back at the ranger’s office OR face a fine of $250. Resource/reservation links are included at the bottom of this article.
If you did not get a camping permit ahead of time, you might be able to get a walkup permit. This is not guaranteed and depends on availability.
Most unguided attempts of Rainier aim to do the climb in a two-day summit push. The total elevation gain of Rainier is 9000ft. Because of this, breaking this up into two days is the most favored itinerary.
Deciding what time to leave Paradise on day 1 is entirely up to your team and how much time you would like at Camp Muir. I would advise leaving no later than noon. The trek to Camp Muir will take anywhere from 4-6 hours.
Once you arrive at camp, you need to leave time to set up camp and boil water. There is no running water at Muir, which means you must harvest water from the Glacier and boil it to prepare for your climb the next day. This is a process that took us about an hour and a half to gather and boil enough water for the two of us.
The night before beginning our trek to Muir, we camped at a free campsite just outside Mount Rainier National Park. Here are the coordinates. We woke up around 6:30 am and started the drive to Paradise.
We took our time getting together the packs, stuffing ourselves with calories for breakfast, and filling the water. Most guided groups came and unloaded, leaving between 9:00 am-10:00 am. At around 10:20 am, we took our first steps out of the parking lot.
The first section of the trail is reasonably steep and extremely crowded. The path to Camp Muir is also a starting point for a variety of easy day hikes. We encountered no other hikers heading for the summit in the first two miles. Most of them were headed to Panorama Point.
Around mile 2.5 you will come to an intersection for Panorama Point, hang left for the Pebble Creek trail. The route you will be heading up to Muir camp is relatively obvious. The trail plateaus slightly near the trail intersection before heading straight up the Muir snowfield.
If you leave anywhere between 8:00 am-12:00 pm, the trail up to Muir Camp will be crowded and easy-to-follow. Muir camp isn’t just for climbers of Rainier; many day hikers make the trek up there, too. Getting to Muir requires no technical gear in the summer (although microspikes/trekking poles are very helpful) and is a standard 4500ft gain. Once you pass Pebble Creek, there is no direct trail, and climbers can spread out and ascend the Muir snowfield in multiple ways.
After cresting a snow ridge near Moon Rocks, the RMI camping bunk at Camp Muir appears deceptively close in view. Most guided groups will take one more break between here and Camp Muir. Don’t overexert yourself to make it to camp in one last push. We saw a fair number of climbers turn around on summit day because they pushed too hard the day before.
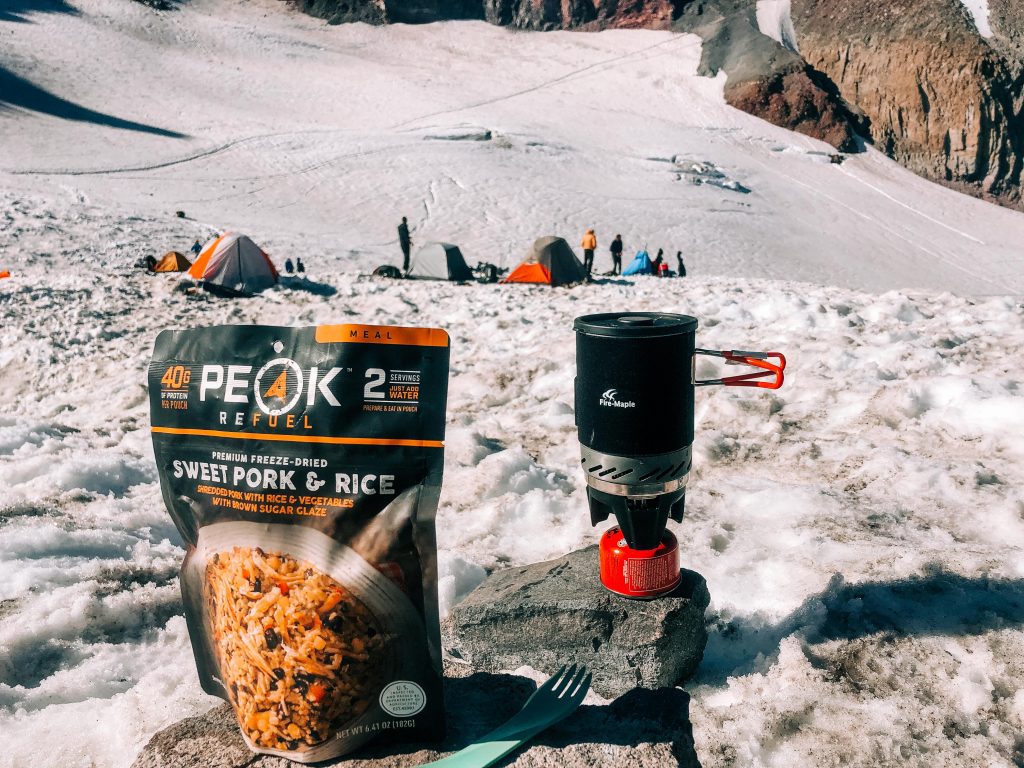
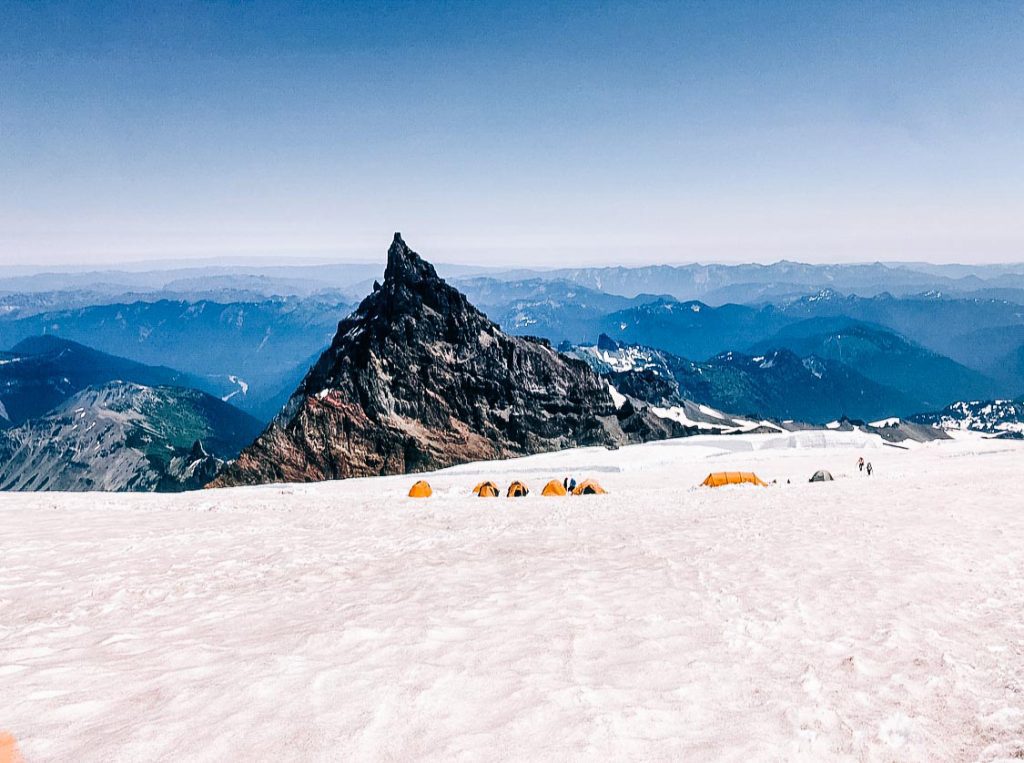
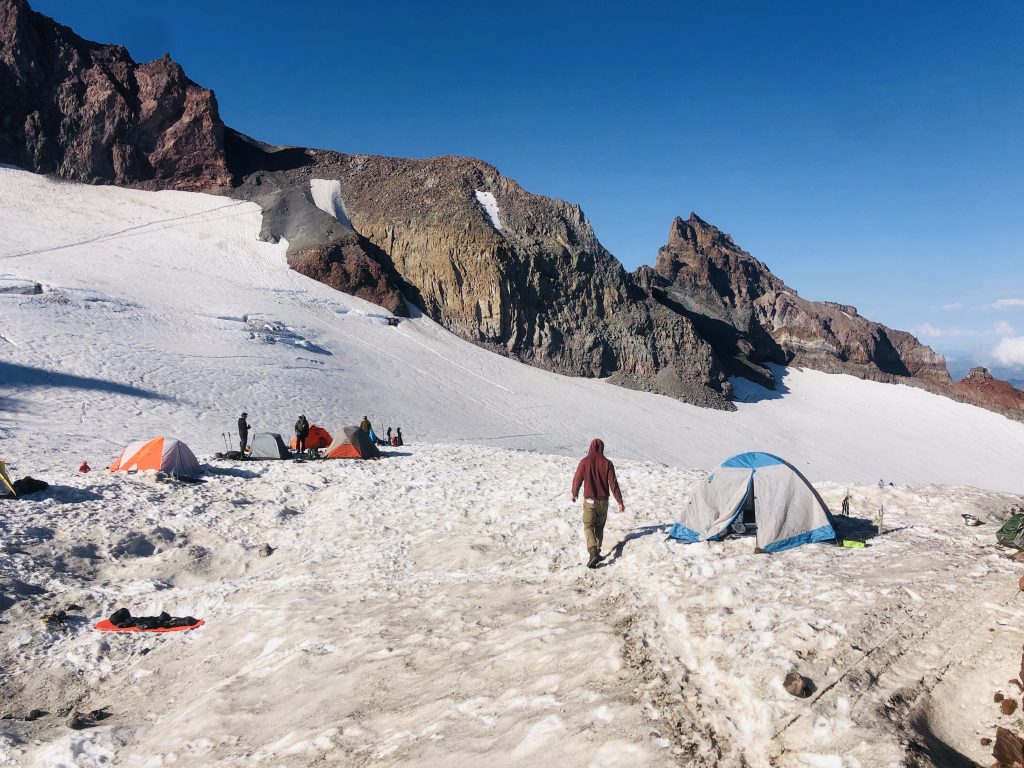
Once arriving at Camp Muir, there will be many obvious tent spots. Most climbers crowd together in the same general area, but we choose to situate our tent near the rock outcrop on a plateau. It is recommended to bring a shovel to dig out a flat spot for your tent. We collectively choose to chance it and leave the shovel behind. By the time we arrived at Muir, it was easier to chop out an even spot with our ice axe.
We spent the rest of the evening boiling water, organizing our gear for the following day, and eating dinner. The volunteer patrol ranger came to our tent around six to chat, check our permit, and provide an update on route conditions. We were headed for the summit on July 9th, 2021, but the record-breaking heatwave the week prior had made the route look akin to August more than July. Most climbers were in their tent before 7:00 pm. We made our way to “bed” shortly after. It was time for the big climb.
Summit Day: Day 2
Climbing Mount Rainer: The Disappointment Cleaver
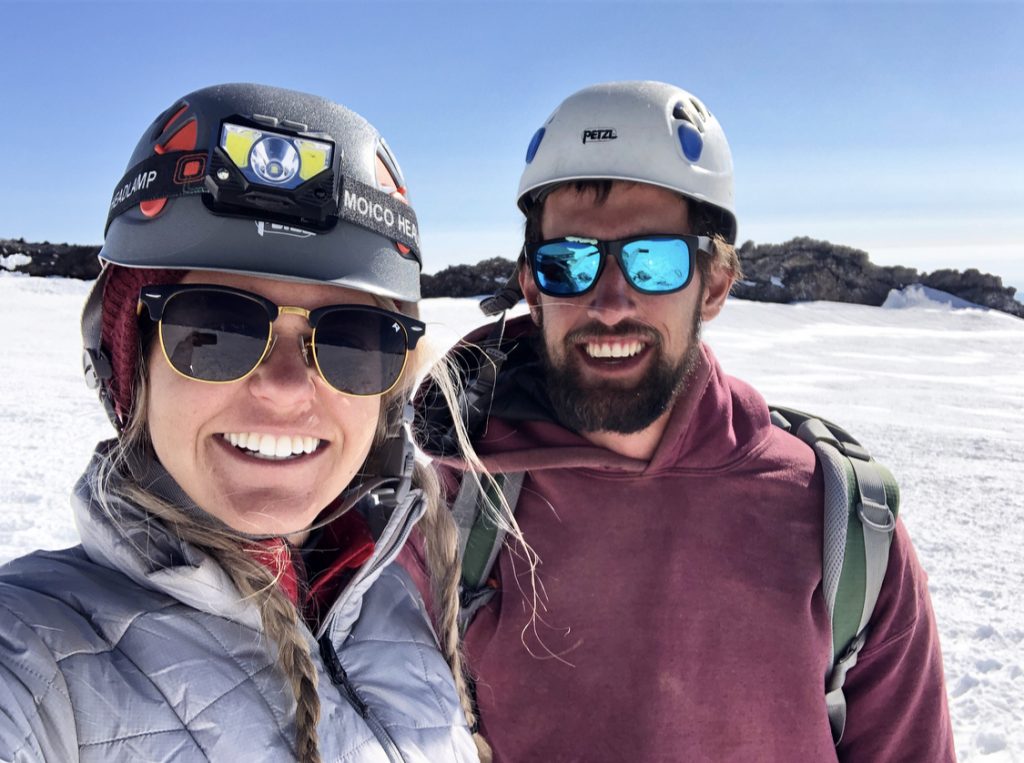
Guided climbs start around midnight. We opted for a 1:00 am start. When the alarm went off at 12:30 am, I forced myself out of the tent and was surprised at how many lights were already heading across the Cowlitz Glacier. It appeared all but three teams had left around midnight with the guided groups.
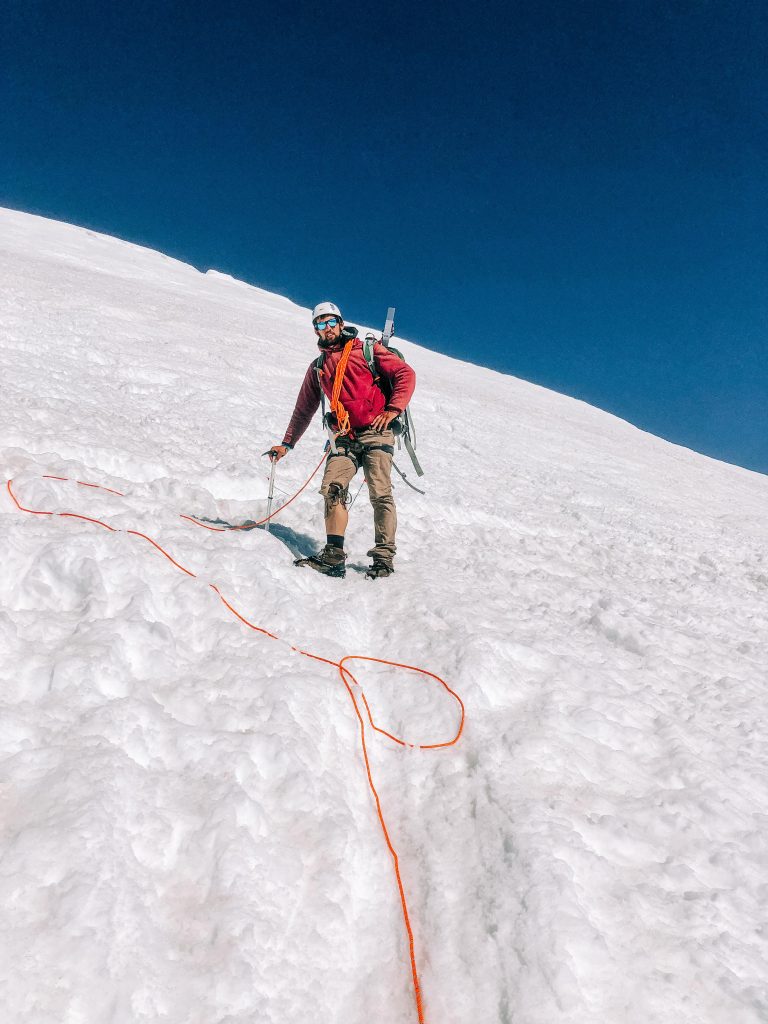
We slowly managed to put on or stow the rest of our gear after the sleepless night and set off at 1:00 am. We ended up leaving simultaneously as another couple who we followed closely for quite some time. The traverse across the Cowlitz Glacier was straightforward and relatively simple. Once we reached the first rock outcrop known as Cathedral Gap, it was a short-but-ungraceful slog over loose rock with crampons.
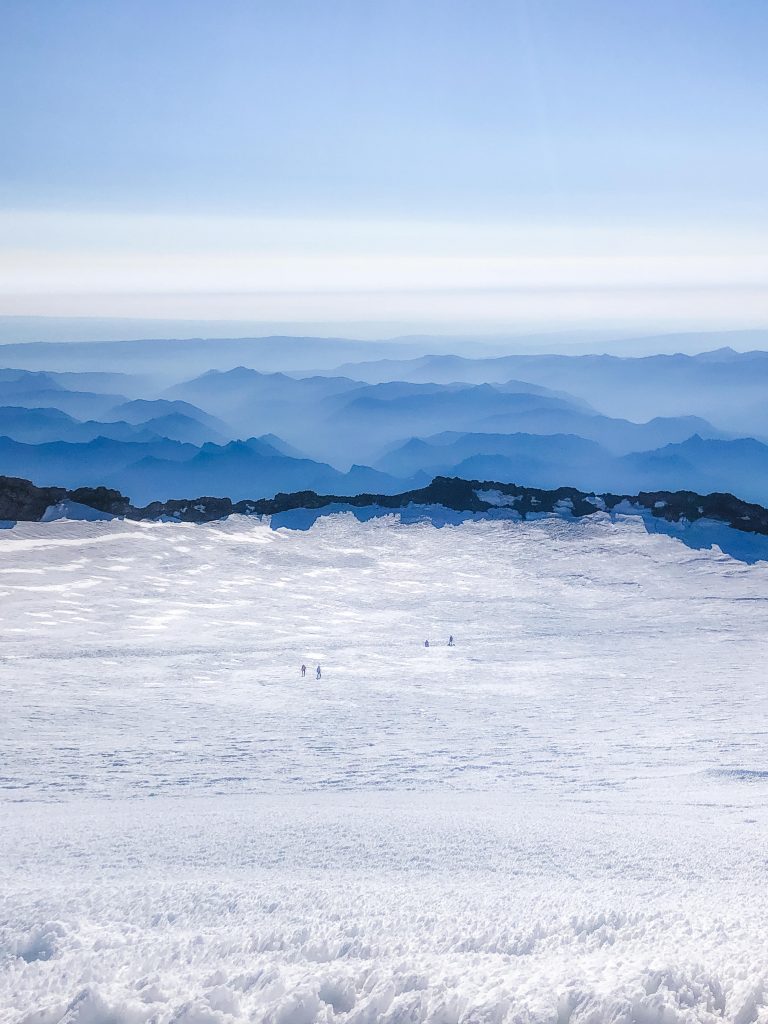
By the time we emerged on the other side at the beginning of the Ingraham Glacier, most headlamps were at the bottom of the Disappointment Cleaver. I didn’t mind being at the back of the pack as the cluster of beams ahead of us looked slightly messy.
Past camp on the ‘flats’ is where the real elevation gain starts. The steep direct uphill was harsh, but it finally felt like we were making the first advance on elevation gain for summit day. We took a quick break shortly after the Ingraham Flats camp as we knew the upcoming section was exposed to icefall and possible serac collapse, therefore should be navigated as fast as possible.
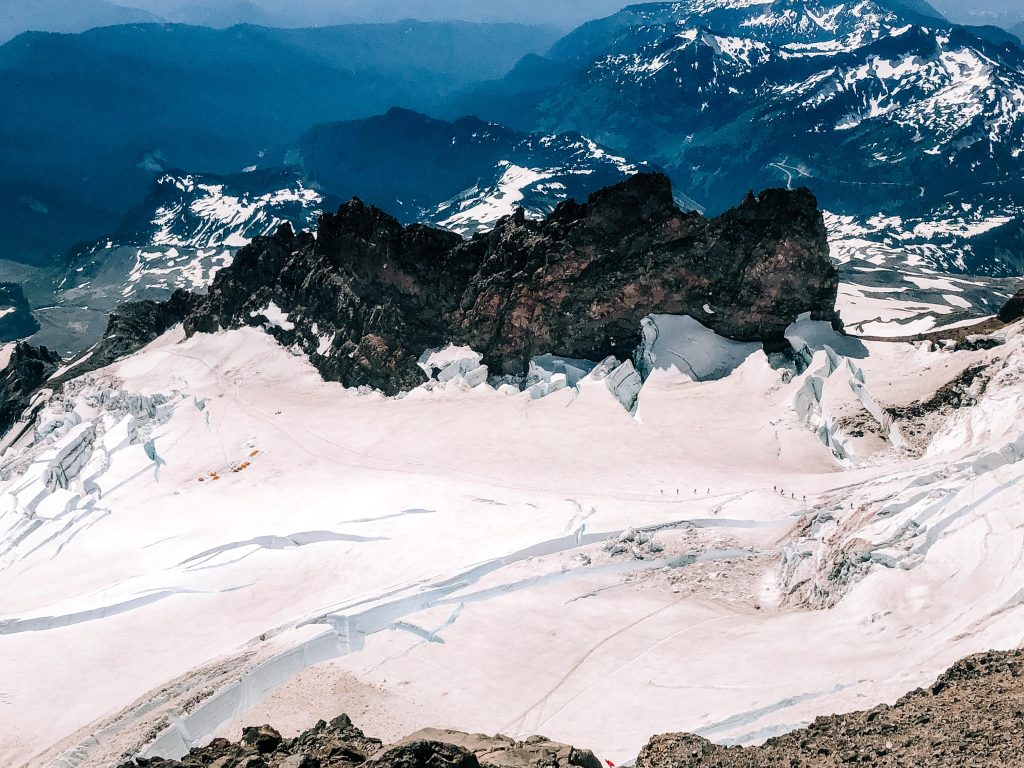
Shortly after the break, we entered the first major obstacle known as the ‘icebox.’ This section is infamous for the worst mountaineering accident on Mount Rainier when 10 climbers and 1 guide were swept to their death by icefall in 1981. In the darkness, it was obvious we had entered the area by the mammoth ice walls illuminated in our headlamps. At the time, however, we were unable to tell the magnitude of the exposed ridges and fragmented glacier above us. I say, ignorance was bliss and made it less intimidating.
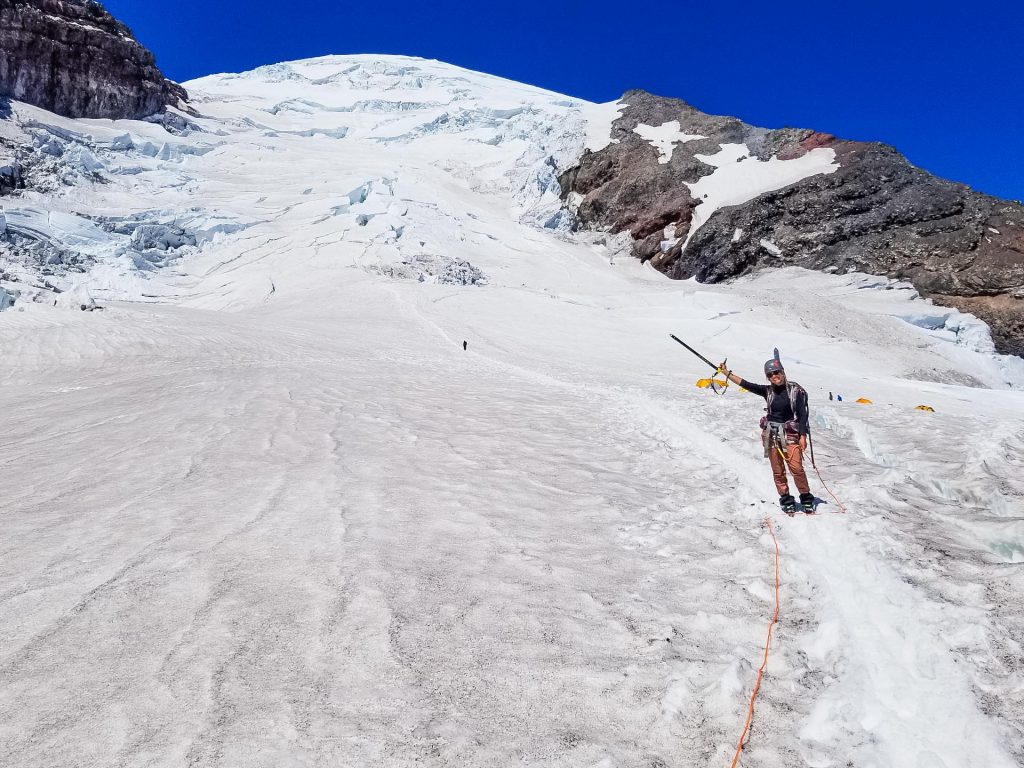
Right after the ‘icebox’ is the second exposed section to rockfall known as the ‘bowling alley.’ It’s relatively flat and can be quickly traversed to the bottom of the Disappointment Cleaver. Once on the rock at the bottom of the DC, we took a quick break to remove our crampons and unrope, then began the slog up what some refer to as the crux of the route.
One small silver lining of Mount Rainier is that even though there is an increased risk of crevasses and rockfall, the scramble and exposure level are manageable. Living in Wyoming, where class 3 and 4 scrambles are standard, I enjoyed the climb up the Disappointment Cleaver route more than most mountains because the exposed scrambles were relatively non-existent. Glacier travel suits me better. There are probably a few borderline class 2/3 moves on the Disappointment Cleaver, but I never felt entirely exposed on the route. I felt much more comfortable on this route than I did scrambling class 4 rock to the summit of Mt. Whitney on the Mountaineers Route.
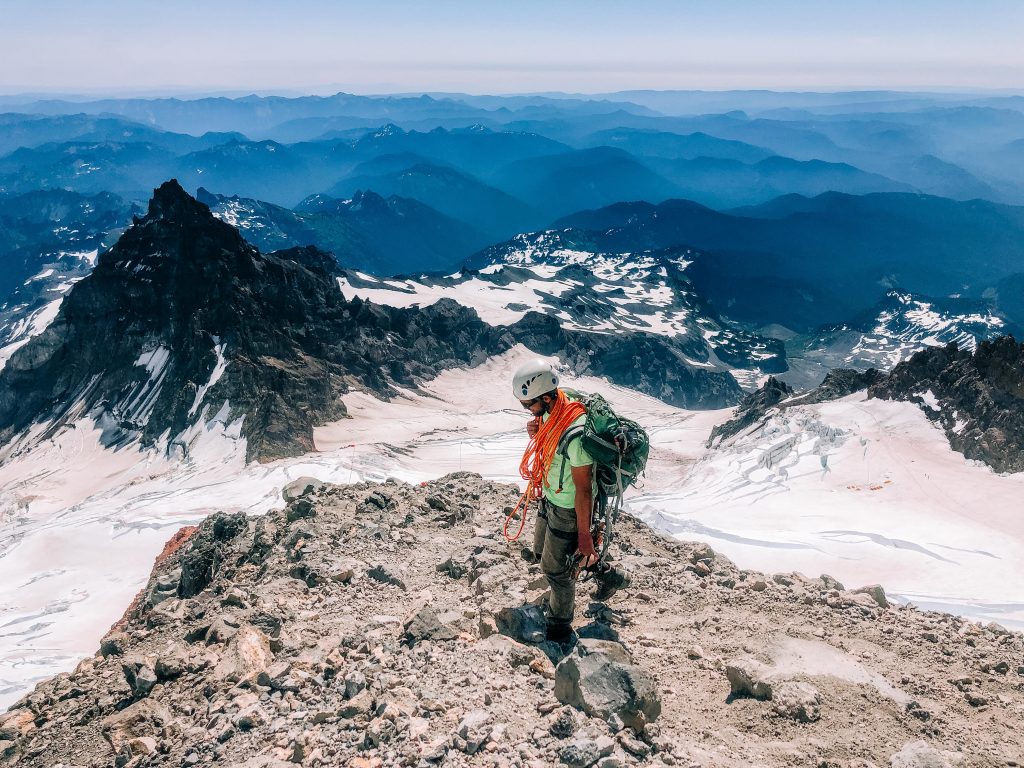
By the time we attempted our summit bid in early July, the Cleaver was completely free of snow. Climbing up the loose rock was much easier without the crampons. I was surprised how many teams stayed roped on this section. NPS officials suggest short roping through this section to decrease the risk of drag and rockfall if you do not unrope completely.
It was also on the Disappointment Cleaver that I began feeling wheezy and the wind picked up. I have a stomach issue that is not related to AMS, but I nearly turned around here because of how dangerous it is to feel unwell on big mountains. We passed about a dozen other people that were on their way down after abandoning their summit bid. I talked to Josh about how I was feeling and we decided to make it to the top of the Cleaver and reassess the situation. The top of the Disappointment Cleaver is only the halfway point between Camp Muir and the summit of Mount Rainier, and many people use it as a checkpoint to decide whether to continue on or turn around.
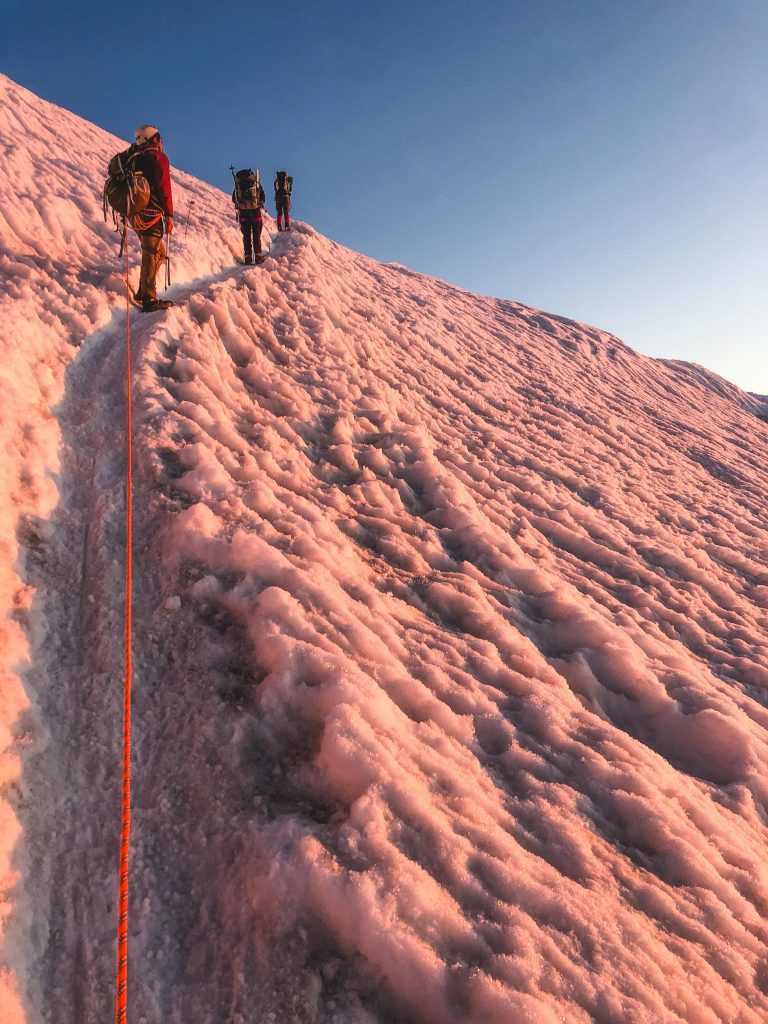
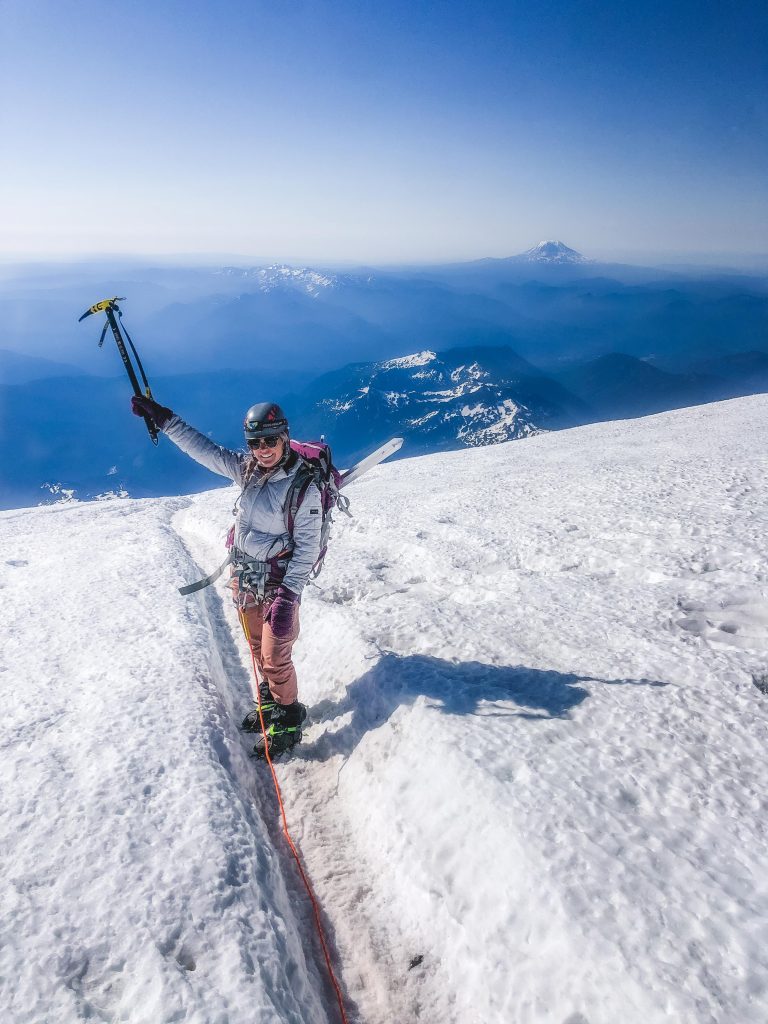
The weather was viscious at the top of the Cleaver. All morning weather conditions were ideal with low winds and moderate temperatures, but around 3:30 am the wind steadily increased and was soon blowing at speeds of 25+ mph. When we stopped to assess our situation, the wind quickly bit through every layer and we made a prompt decision to keep pushing up the mountain. I was feeling OK and wanted to continue on, even if was to simply to circulate blood flow and regain warmth. We took five additional minutes to unfurl the climbing rope, secure our crampons, and began the trek on the upper glaciers of Mount Rainier.
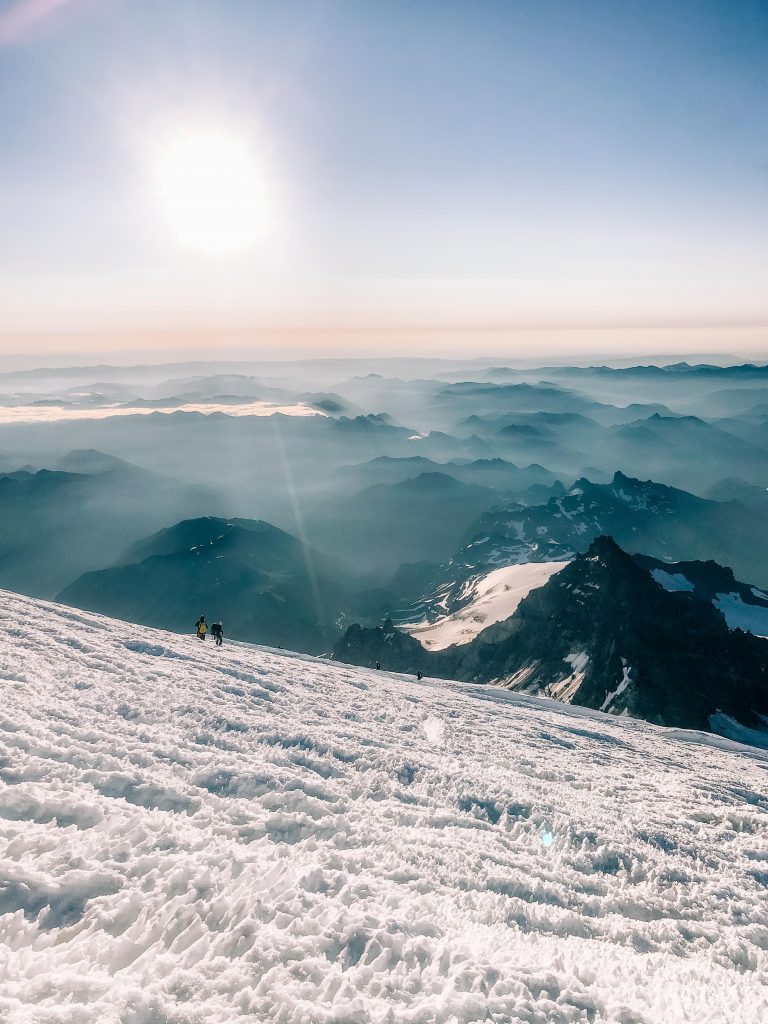
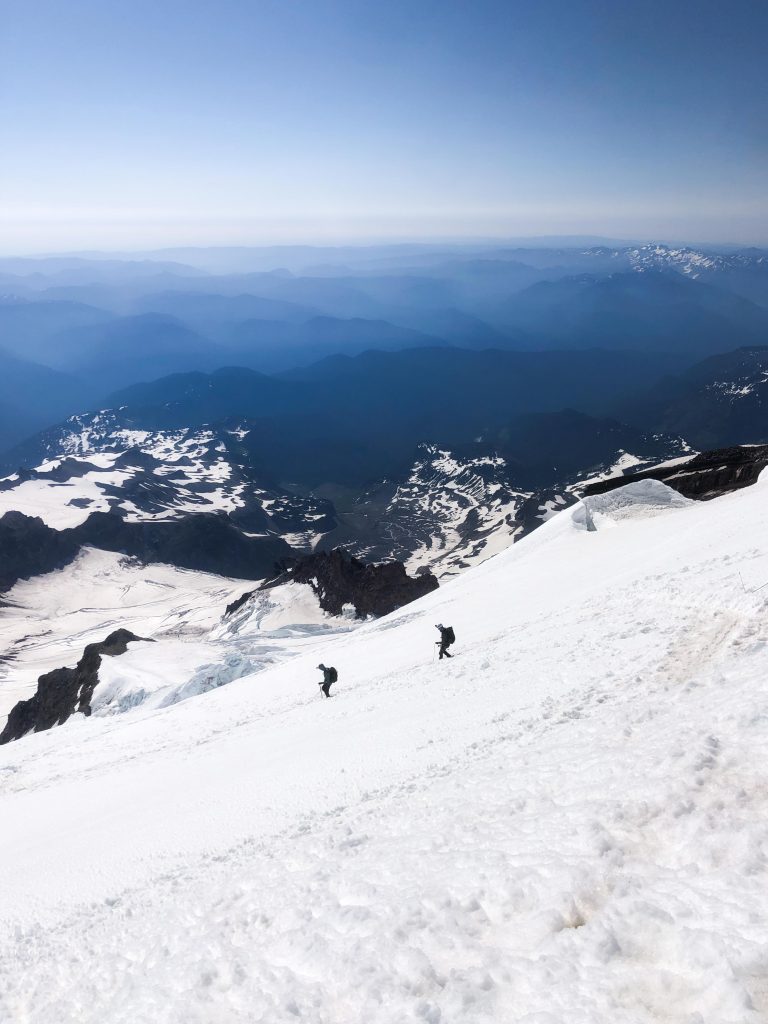
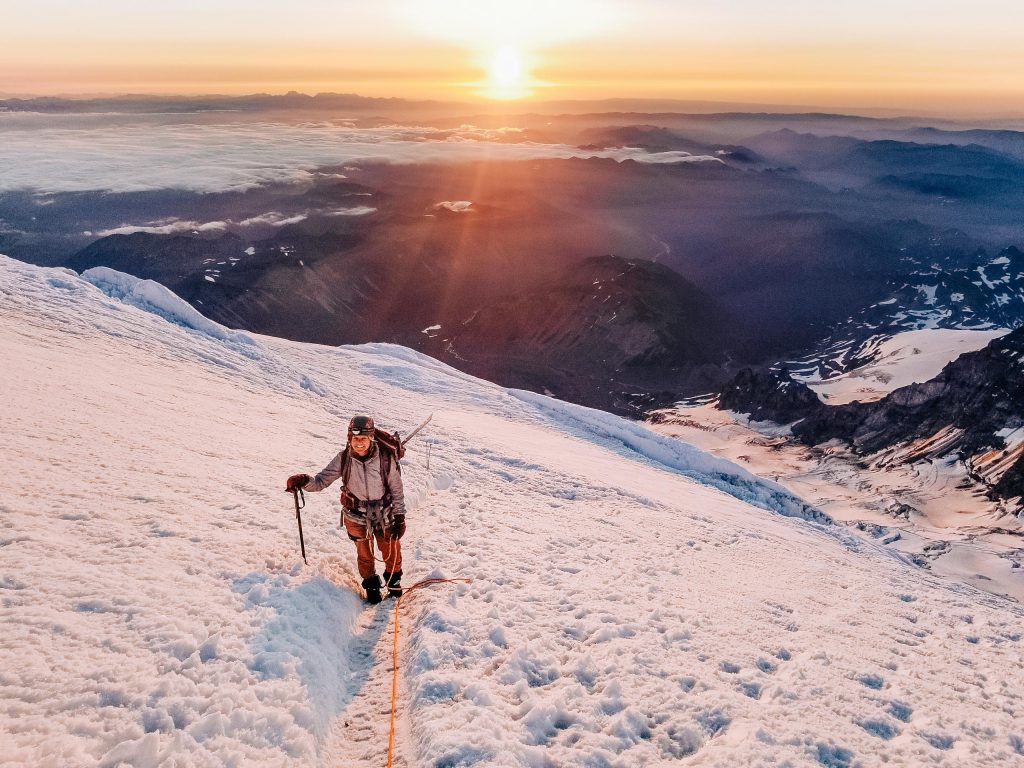
Above the Disappointment Cleaver is where the fun really began. Depending on the type of year and condition of the route, the remaining climb to the summit will differ for every climbing party. For us, there was an obvious and direct route leading above the cleaver to the left of an open crevasses system. This is also where the first shades of the sunrise began peeking over the horizon.
Roughly 30 minutes after continuing, the wind subsided a bit more and the tortuous morning quickly became pleasant. We moved steadily through the upper glacier sections, still following closely behind the team we left camp with early that morning.
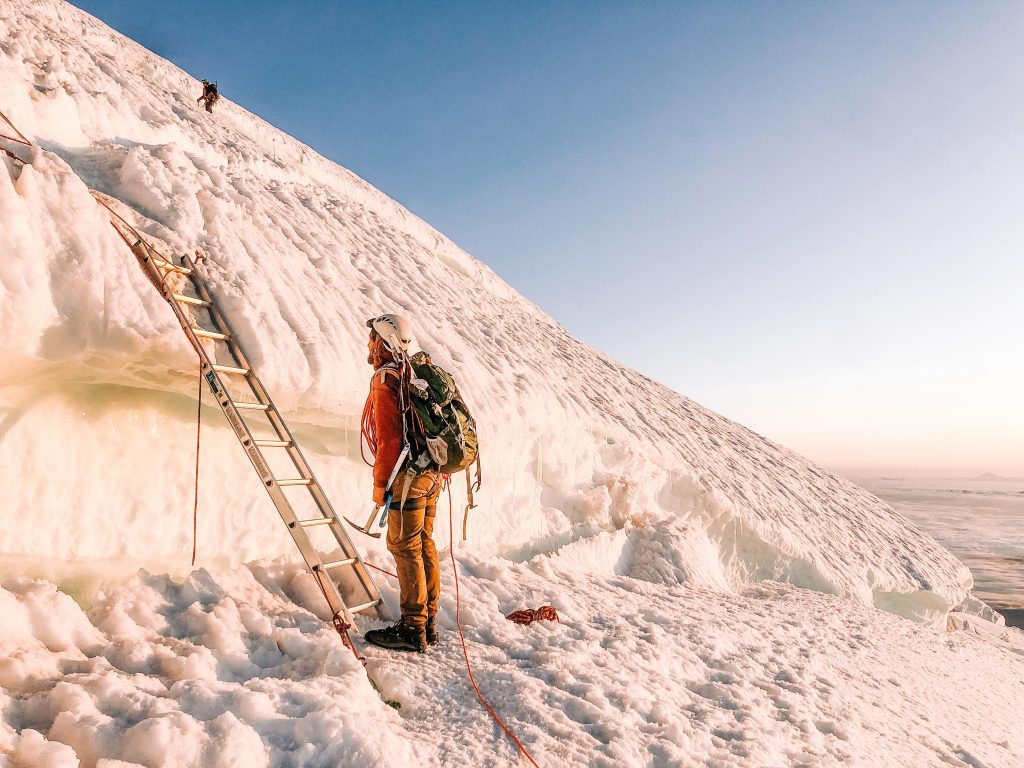
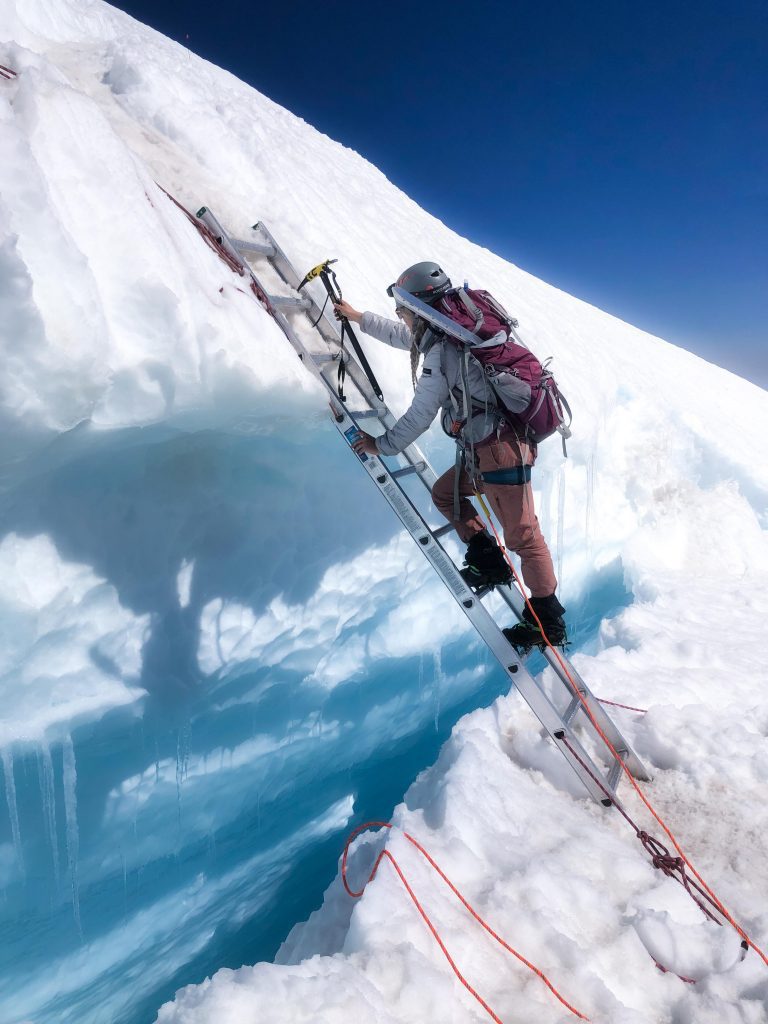
At around 13,100ft, there was a large, exposed crevasse system with a ladder placed by the RMI guides. The ladder crossed the 5-6 foot gap at a 70-degree angle and had anchored ropes to clip into as extra security for climbers. This was another spot I was happy to be at the back of the climbing pack as we were not rushed through the ladder and took some time to enjoy the moment and snap some photos of the sunrise.

Above the ladder, the summit looks deceptively close. It was just after 5:30 am and we still had about two hours of climbing to the summit. Josh could’ve easily moved at twice our pace, but we were taking it slow and cautious in an attempt to keep any stomach issues at bay. From here, the trail continues to follow a trail marked by the guide wands as it weaves onward through the upper glaciers.
Although we were climbing in early July, the route conditions mirrored August. Old trails that led to exposed crevasses with collapsed snow bridges were marked by an ‘X’ created by intersecting two wands. Depending on the time of year you climb, pay close attention to the trail and the markers. As the season progresses, the route continuously changes. If you accidentally cross a closed trail, you will be navigating unsafe territory.
The upper glaciers were warm and pleasant with the morning sun. We had one additional crevasse crossing that was cleared with a quick ‘hop.’ About 500ft from the summit, we encountered the first guided group descending. It was easy to safely step aside from the boot path trench and let them and each group pass as needed.
The upper glaciers are a slog, but I found the adventure in it enjoyable. A protruding rock rim is the first sign the summit is within reach. The final feet are steep and direct. My stomach issues roared back to life just below the rim and stepping through the gap into the crater was one of the best feelings. After feeling sick earlier that morning, I couldn’t believe it had subsided long enough for a successful summit. I nearly cried.
The Summit: Mount Rainier
We arrived at the summit rim at 7:40 am. To our surprise, you could fit a football field inside the crater. Close to 30 people, including two guided groups, were roaming about, resting, or organizing gear. Even with the ‘crowd,’ there was plenty of room to wander and spread out.
Some climbers choose to claim the summit at the crater rim. However, the actual summit is on the opposite side of the crater basin at Columbia Crest. Although I wasn’t feeling great, I couldn’t come this far without claiming the true summit. We threw our packs in the middle of the crater to officially finish the last of the climb.
If you reach the summit of Mount Rainier and say, “am I here?” Don’t worry—you are not alone. There are two spots on the crater rim that look like they could be the ‘summit.’ I’m sure someone could tell me here, but neither we nor any other group nearby had an idea which one was taller. There was no plaque, or cairn, or summit register. We walked to both, better safe than sorry. A bit anti-climatic after such a climb.
(note: there is a logbook directly below the summit on the north side of the crater)
Descending the Disappointment Cleaver
I won’t spend too much time going over the descent, but a few touchpoints need to be included.
- It’s a long way down: the summit is a great feeling, but you’re technically only halfway finished. If you’ve chosen not to spend a second night on the Muir or Ingraham Glacier, you must descend to Paradise, 9000ft below. We were back at camp around 1:00 pm and spent an hour resting, drinking a lot of water, and snacking. We packed and left camp around 2:30 pm, making it back to the car in Paradise at 5. A 16-hour day total.
- Hot summer days = slushy snow and increased risk: We were one of the last to descend from the summit just before 9:00 am. We knew even then we were pushing it. The sun quickly warms the surface snow and causes messy descents once it gets too warm. About halfway down the upper glaciers, we passed a group of four that left camp at 4:30 am and were headed toward the summit. I can’t imagine how unpleasant and sweltering their downclimb must’ve been. In addition, the little ‘crevasse’ we hopped over on the ascent cracked beneath my feet on the way down, but thankfully stayed intact. Descending later in the day increases the risk of snow bridges failing, crevasses opening, and hazardous rockfall.
Final notes on climbing Rainier
This is type II fun at its finest! I will be the first to admit I would’ve enjoyed the climb a lot more without feeling ill a few times. When I felt great, the climb was great. My legs felt strong, and honestly, I wasn’t nearly as sore as I expected coming out of the climb. Josh, being the crazy mountain man that he is, went on to summit Mount Adams the day after Rainier, beating out every other climber on the mountain that day.
Mount Rainier is a beautiful climb. The Disappointment Cleaver is the ideal route for those looking to get in some solid mountaineering while having the benefits of trails maintained by guides. Thank you to those guides who help maintain, navigate routes, and set up equipment for not just your clients but for all on the mountain to use and enjoy.
Have fun, make smart decisions, and enjoy the climb! Few get to experience Mount Rainier from the summit. It was tough, but it was more than worth it. By far, the best way to experience and appreciate the mountain.
Additional Resources for Climbing Mount Rainier
There are many additional resources for looking to climb Mount Rainier. These include,
Mount Rainer Climbing Blog
Park Service Rangers maintain a regularly updated blog outlining current route conditions and descriptions.
http://mountrainierclimbing.blogspot.com/
Disappointment Cleaver Route Brief
The National Park Service has put together a helpful packet with essential descriptions, packing checklists, specs, and hazards. We printed this out and reviewed it multiple times in the week leading up to our climb.
https://www.nps.gov/mora/planyourvisit/upload/Disappointment-Cleaver-Routebrief-2017_FINAL.pdf
Permit and Reservation Systems for Disappointment Cleaver
Recently, the park implemented a new online reservation system for Camp Muir, which most groups use as a basecamp. 2/3 of reservations are made available for advanced reservations. 1/3 of spots can be secured via walkup permits on a first-come, first-served basis.
https://www.recreation.gov/permits/4675317
All independent parties must also obtain a climbing permit and pay a $56/person climbing fee. Climbers MUST obtain their climbing permit at the Wilderness Information Center in Paradise the morning of their climb. After the climb, permits must be returned to a dropbox in the office. Failure to return your permit will result in a $250 fine.
https://www.nps.gov/mora/planyourvisit/climbing.htm


At any given moment, Shalee is either lost, hunting for ice cream, or obsessively planning her next adventure.
Born and raised in rural Michigan, she began exploring the shores of Great Lakes as a teen, often sleeping in her car to save money. Eventually, her urge to explore pushed beyond her Midwest borders. Today, Shalee shares her tips and stories to thousands of readers interested in adventure and outdoor tourism. Her pack now includes two spunky hiking cats and her partner, Josh. Learn more about her here.
Join the Adventure

")
This is the absolute, obviously best climbing Mount Rainier guide. SO COMPREHENSIVE! And the pictures? C’mon.
I really like this guide. We camped at the flats for four nights waiting for weather to summit when we claimed Mt Rainier. As we live at about sea level in Sweden, we had to deal with acclimating. We went up to the Muir snow field and camped. Visited Camp Muir and hang out for some time. During night we realized that the Thermarest wasn’t enough insulation and as we were on an acclimating trip, we went back to REI in Seattle to get closed cell sleeping pads to have below the Thermarest pads for the summit bid. It was valuable to try camping on snow before doing the real thing.
When we were at Denali the year after, #49, we brought the two pads with us as it was on the pack list for Denali. We finished with Hawaii to become Completers.
Awesome content! Saving for future reference.
Go back and climb the Kautz. Hardly any people on that route. It’s way more enjoyable than jacking around in the cleaver. That is just unfun.
Well done.
Oh my gosh: Best. Climb Log/Summary. Ever.
Thank you so much for such excellent information, commentary, and resources.
Wow you are awesome, this looks so hard to climb! I think I could never do it!